Trang

Thứ Ba, 26 tháng 2, 2013

Thai Peanut Noodles with Chicken

I have a few favorite dishes that I like to eat out at restaurants and figured, why not try to recreate them at home?  It may seem intimidating to make something you typically only order, but it's really satisfying to have at home, not to mention healthier, since you can control the ingredients.
Case in point here is Thai Peanut Noodles with Chicken.  I like this dish because it's colorful, full of veggies, like snap peas, radishes, red pepper and bok choy (chinese cabbage), and so flavorful.  I added in grilled chicken breast for extra protein.  Using a prepared rotisserie chicken is also good here, but then you're getting the dark (fattier) meat.


I steamed the snap peas for about two minutes, but tossed in the chopped radish, red pepper and bok choy in raw.  Doesn't get easier than that. 


I cheated a litte on the peanut sauce because I have some that I really like from the bottle (but it's not the healthiest so I use just a small amount), then add in natural peanut butter, chile sauce, lime, and sesame seeds. 


I used whole wheat spaghetti cooked according to package instructions.


Then assembled the whole thing.  I like this dish cold, but you can eat it warm too. 


What is your favorite restaurant dish to create at home?

* * * * * 


Chủ Nhật, 24 tháng 2, 2013

Mushroom & Onion Sliders with Aioli Sauce

Every couple of weeks, I crave a juicy burger.  Usually, if ordering one at a restaurant, I can only get through about half, because it's so much food with the bun.  Sometimes I order the burger without the fun, and just eat it with a fork.  Do you do that too?

The other night, I made a sliders (just smaller burgers) and topped them with sautéed onions and mushrooms with a bit of aioli sauce.  We ate it with a side of spinach too.


Sliders

To make the sliders, I used about one pound of lean grass fed beef and portioned them into 5 patties.  I seasoned them with a little low sodium soy sauce and cooked them in a grill pan on medium high for about 4-5 minutes per side until medium.  

Onions & Mushrooms

I cut the onions and mushrooms into small dice and chopped a few cloves of garlic.  Sautee the whole thing in a couple tablespoons of olive oil and season with salt and pepper.

Spinach 

I used a giant bag of spinach and sautéed it in a pot with a little olive oil, salt and pepper, and garlic.  The spinach wilts down so don't be worried it seeming like too much. 

Aioli 

I made aioli by just combining low-fat mayo with dijon mustard and garlic.  Since it was just for two people, I added about 1/8 cup each of the mayo and mustard and one garlic clove.  You typically add a little lemon juice, but I didn't have any.  

*I always use a very light hand when seasoning with salt.  I think it's better to salt your food at the table because you end up using less and tasting it more. 


* * * * 

Thứ Năm, 21 tháng 2, 2013

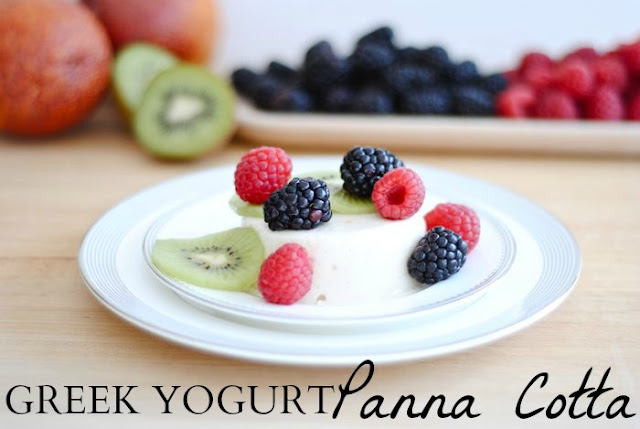
Greek Yogurt Panna Cotta


Hi there, Honey We’re Healthy readers!  I’m back with a little something I haven’t done before here on Megan’s blog - dessert!  


I’m a big believer in moderation when it comes to food and usually indulge in desserts on the weekends.  This luscious panna cotta manages to be both an indulgence and a healthy choice - does it get much better than that??

My husband compared the taste to an orange creamsicle and as soon as he said it, I said, “Yes!  That’s exactly what it tastes like!”  But a more sophisticated creamsicle.  A creamsicle for refined adults, darling.

Traditional panna cotta is made with heavy cream while this lighter version uses 2% milk and Greek yogurt.  The orange zest adds the perfect little punch of flavor and the threads of orange mingled with vanilla bean specks is really quite pretty.  I loved it topped with kiwi slices, blackberries, and raspberries for some added color and a nice dose of antioxidant goodness.

And just a quick note - this recipe is not hard to prepare but it does have to sit in the fridge for a good 8 hours to set.  So be sure to think ahead if you plan to make it!


Greek Yogurt Panna Cotta

Ingredients
1 1-oz. package unflavored gelatin
1 1/2 c. 2% milk
1 tbsp. vanilla bean paste*
1/2 c. sugar
finely grated zest of one orange (I used a microplane to zest a blood orange)
2 c. plain 2% Greek yogurt
grapeseed oil
berries for topping

Pour 1/2 c. milk into a small bowl and sprinkle gelatin over the top to soften.  Let sit without stirring for about 10 minutes.

Meanwhile, pour the remaining 1 c. of milk into a small saucepan over medium heat.  Add vanilla bean paste, 1/2 c. sugar, and orange zest and stir until the sugar dissolves and the mixture starts to simmer.  Remove from the heat and add the gelatin mixture.  Whisk to fully dissolve gelatin.  Transfer to a large bowl and set aside about 10 minutes to cool, then whisk yogurt into mixture until smooth.

Drizzle a bit of grapeseed oil into each of six ramekins and spread on bottom and sides with fingers or a napkin.  Evenly divide yogurt mixture among the ramekins.  Cover and refrigerate until set, 8 hours or up to 2 days ahead of time.

When ready to serve, run a butter knife along the edge of the panna cotta, all the way around the inside of the ramekin.  Invert it onto a plate and give it a good shake or smack on top of a padded surface (I used an oven mitt!) and remove the ramekin.  Top with berries and serve.

*Vanilla extract can be substituted for the vanilla bean paste but you will lose the lovely little vanilla bean flecks in the panna cotta.  You can also substitute a whole vanilla bean - cut in half, scrape the seeds out, and add the seeds and pod to the milk mixture on the stove.  Remove the pod before whisking in the yogurt.


* * * * * 
Thank you for this post from contributing writer, Jennifer, of The Chronicles of Home.  You'll definitely want to check out her blog for more amazing recipes, beautiful home decor, and easy-to-follw DIY projects!


Thứ Ba, 19 tháng 2, 2013

Grilled Shrimp Tacos


Last night's dinner was really good and so easy to throw together.  When you need a fast meal, I like to take advantage of grocery store items that help save time.  If you have a bag of frozen shrimp, shredded lettuce (or cabbage), pico, and tortillas, you've basically got shrimp tacos!


Frozen, tail off, peeled and deveined shrimp are always on sale and in our freezer because all you have to do is thaw and heat.  You can thaw them in the fridge, but I usually put them in a strainer and run cold water over them for a couple minutes, then dry with a kitchen towel. 

The store bought pico is super convenient, but I sometimes add a fresh squeeze of lime or more onion since ours tends to be heavy on the tomato.


I made a simple taco sauce with low fat sour cream, a touch of milk, some paprika, salt-free seasoning, and low sodium old bay.  


I grilled the shrimp in olive oil and garlic and seasoned with old bay.  The tortillas were heated in a dry skillet.


Finally, just assemble your tacos.  I layered the sauce, lettuce, pico, sliced avocado, and then the shrimp.


The bag of shrimp above made four tacos. 

* * * * * 


Chủ Nhật, 17 tháng 2, 2013

Quinoa Caprese Salad


Happy Monday everyone!  Hope you all had a great, refreshing weekend!  I've been utilizing the chalk wall in our kitchen to write out our weekly meal plan and I love it!  I think I resisted because it's hard to know on a certain day what you're going to want to eat, but I figure, get it all planned out and grocery shopped so you have something to eat and you can just switch the days around if you want.


Preparing weekend lunches is a favorite of mine.  It's really nice to enjoy a home-made meal if you're at the house to eat it:)  With all the weekend running around, sometimes eating while out is more convenient.  This Saturday, having completed the morning errands and getting home in time for lunch, I made a quinoa caprese salad with grilled chicken.  This is one of those easy-to-assemble meals that is packed with protein and flavor.


I start by grilling boneless, skinless chicken breasts in olive oil for a few minutes at the same time I boil the quinoa.  Quinoa cooks quickly, about 8 minutes.  I used 1 cup of quinoa and 2 cups of organic chicken broth to give it more flavor. 


Then, because the caprese ingredients are a favorite combo (tomato, basil, and mozzarella) I assembled them all together. 


Quinoa is a good source of fiber, magnesium, iron, calcium and fiber.  It has a slightly nutty flavor, but mainly takes on the flavors you cook it with.  It cooks quickly, in about 8 minutes.   Then I chopped the cherry tomatoes and mozzarella balls in half and tossed in the basil. 


I seasoned my salad with olive oil, balsamic vinegar, and salt-free seasoning. 


A bright, refreshing (and filling) salad!


After lunch, I portioned the rest out into plastic containers for quick meals later on during the week.  


Have you tried quinoa- do you like it? 

* * * * * 

I finally completed all 12 weeks of the Live Fit challenge (yay!)  and will be bringing you the low down with my progress later this week- I need to get my body fat measured first:) 

* * * * * 

Thứ Tư, 6 tháng 2, 2013

My Live Fit (Weeks 10 & 11) Recap

Hi all!  Just popping in to share my Week 10 and 11 workout sheets with you.  I'm so happy to be on Week 12 (the final week) now!  I must admit my eating hasn't been that great the last couple of weeks, and I need to improve that.  My schedule is so up and down during the day that I haven't been eating my consistent meals.  I need to figure out how to get that under control- I know I'll feel so much better!


Hope you're having a great week!

Thứ Hai, 4 tháng 2, 2013

Live Fit Weeks 10 & 11 FINISHED

Ah, I'm so relieved to have finished weeks 10 and 11 of the Live Fit program.  That means I am on the FINAL WEEK!!!  Yay!  And I'm exhausted and ate too much during the Superbowl!  I did work out yesterday even though I didn't feel like it, but sometimes you just have to push through.  I'm anxious to get measured and weighed again so I can share the results with you.  I'll do a full recap with pics soon!


Thứ Sáu, 1 tháng 2, 2013

Garlic Red Pepper Cauliflower Hummus (Our Fifth House)

Y'all are in for a treat today because one of my favorite people, Carmel of Our Fifth House, finally caved and agreed to share a healthy recipe with us today. Carmel's blog is definitely one of my daily reads and if you don't know her, I encourage you to stop by and say hello.  Tell her I sent ya! :)


I'm a little bit in love with Carmel's living room and bedroom, see why?!


Carmel's family eats gluten-free and has recently gone Paleo too.  In light of the Super Bowl this Sunday, she's sharing a healthy Garlic Red Pepper Cauliflower Hummus that you can snack on while you watch the commercials and halftime show game.

* * * * * 

Hi, healthy peeps, I'm Carmel from Our Fifth House.  As you may have guessed from the name of my blog I write about home related projects  - diy, design and organization.  While I'm definitely passionate about creating a home, I'm also a big lover of good, healthy food.  In fact, eating healthy is one of my biggest goals for 2013.  I've been gluten free since August of last year and made the full conversion to a paleo lifestyle in January.  I call it a lifestyle because that's what it is to me  - a lifestyle - not a diet.  If you're not familiar with "paleo eating" this is a great place to start to learn more.  Very basically eating paleo is about eating good healthy unprocessed food - meats, veggies, fruits, nuts and healthy fats.

What you might notice is missing from the above list other than grains is legumes.  Giving up grains is not a huge issue for me but legumes??  That was much harder.  I've always been a big fan of legume rich foods and my all time favorite healthy snack pre-paleo was hummus, which is traditionally made from chickpeas.  After doing a little research and kitchen taste testing, I've found a great alternative to chickpea hummus using cauliflower.

garlic red pepper cauliflower hummus

This hummus is soooooo good and it packs a major veggie punch - dipping veggies in veggies.......who knew it could taste so good?!


The trick to using cauliflower in this recipe is to steam it until it's pretty soft  - like when you can fork through it easily.

It's so easy to make, and I like it even better than chickpea hummus which is why I wanted to share it here.  Even if you're not paleo you will love this!   I've been making it on the same nights that I make mashed cauliflower (replacement for mashed potatoes) for dinner.  Making dinner and making snack food for the week at the same time cuts down on the work time in the kitchen and helps me to make good snacking choices throughout the week.  When your trying to eat healthy it is so helpful to plan ahead!

Snacking has always been a problem area for me, so having a healthy, easy-to-grab tasty snack ready to go in the fridge is so important for me!


How do you deal with the snack monster?

Thanks so much Megan for having me over to share a recipe today!  You're such an inspiration for us all!